Alright, guys, that’s the 3rd and last part of our Distributing Python Apps for Windows Desktops series. In this post, I’ll show how to create an MSI installer using Inno Setup and add MSVCR’s DLLs to make Python work on any Windows computer.
The other two parts are:
- How to create a Python.exe with MSI Installer and CX_freeze
- How to create an application with auto-update using Python and Esky
In the first part, we’ve learned how to create an MSI with cx_freeze and use the MSVCR from your own OS with the include_msvcr parameter. After that, we have updated our program to include an Auto-Update service.
OK, but now we can’t use the cx_freeze to make an installer anymore. It happens because Esky modifies your program creating an executable that verifies your program updates on FTP if it has some update available, esky downloads it, checks if everything is ok and remove the old files. No problem, let’s solve this with Inno Setup
1st thing, download and install Inno Setup.
Inno Setup generates a script file (.iss) for you to make your own installer. You can write your own script or use the Script Wizard.

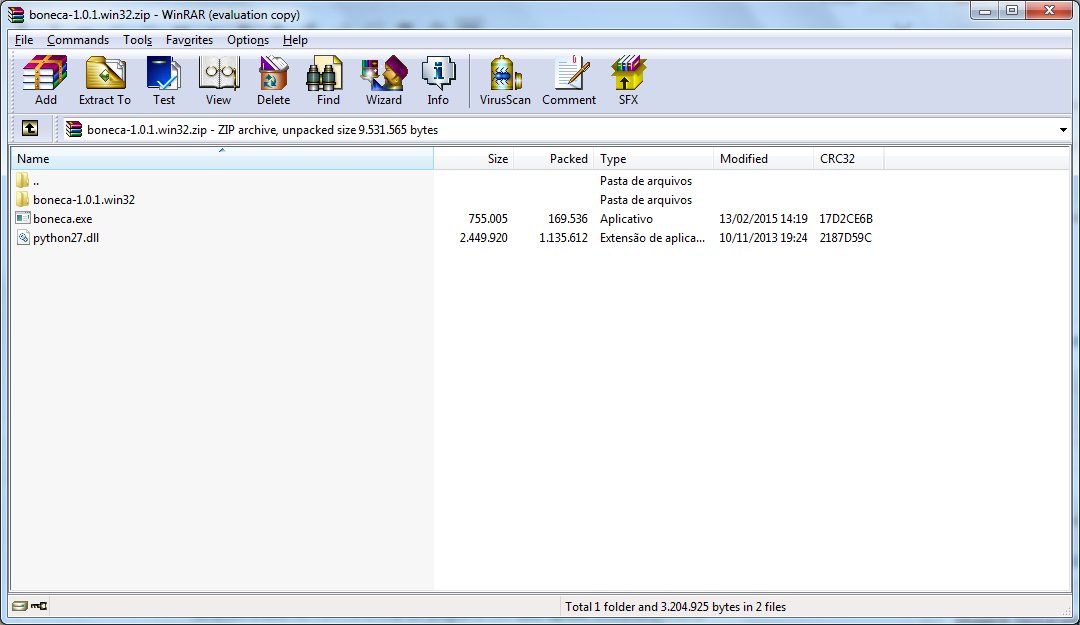
First, we’ll use the wizard and the file boneca-1.0.1.win32.zip that we have generated on the previous post (Part II). Unzip this file.
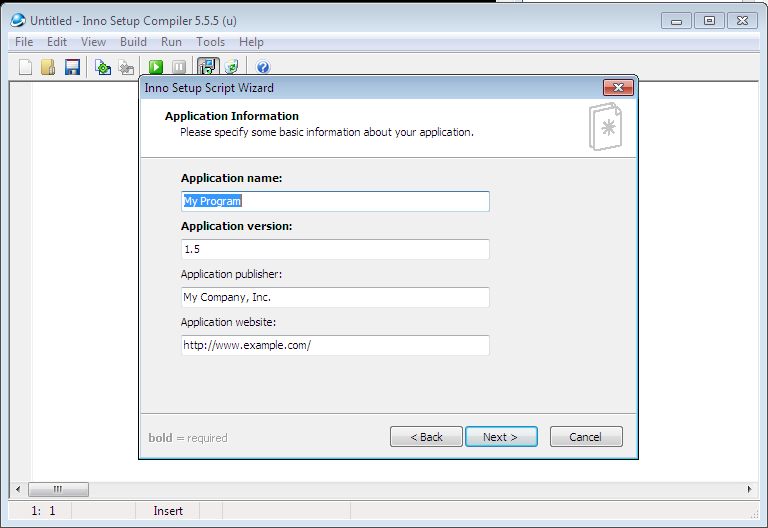
Back to Inno Setup click File >> New. The wizard is pretty straight forward. Fill the blanks as you like.
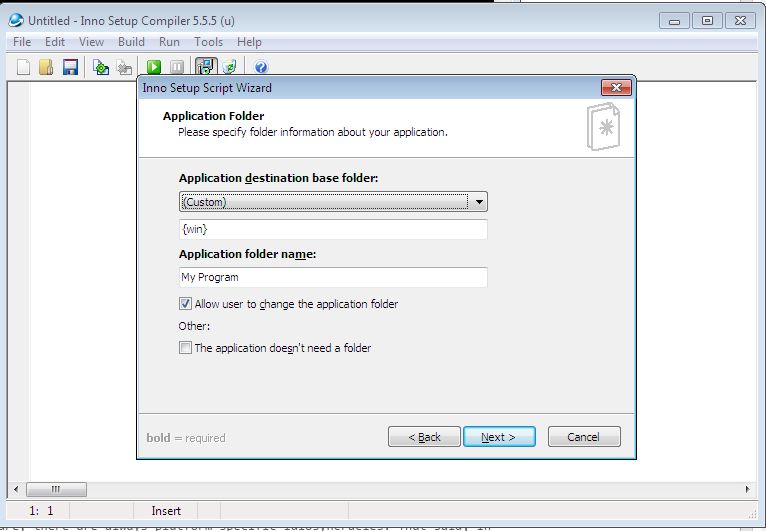
In the next screen, you can choose the folder to install your App. The default is Program Files, but if your code is not signed (using a Code Signing tool) you may have problems with Windows UAC. It will not recognize the authenticity of your code and you can struggle with antivirus, Windows security and it can stop your program from doing the auto-updates. So, at first, you better use another folder. You can type a path or use a Directory Constant.
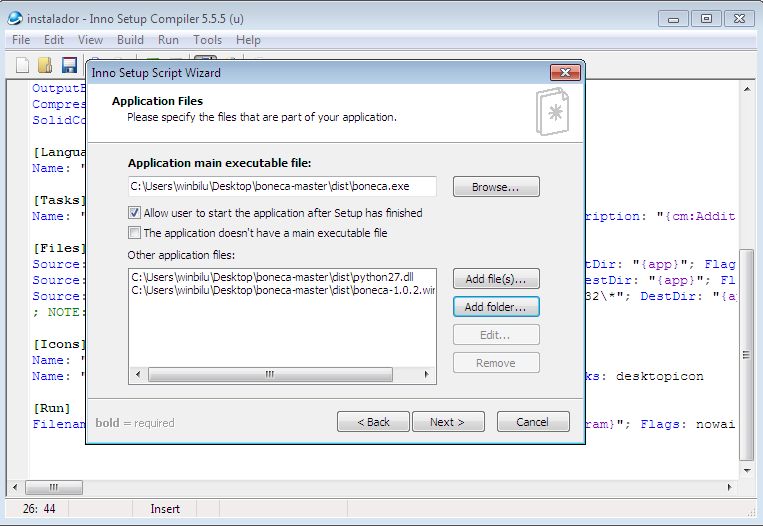
On the next screen, you’ll add the programs, folders, and files that will be installed. In this case, boneca.exe and python27.dll at the root level and the boneca-1.0.1.win32 folder with its content.
Don’t forget to add boneca.exe as Application main executable file.
Now, go ahead with the standard procedure to windows programs (next, next, next…). At the end, it creates a .iss file. You can compile and it will generate a .msi Installer. But, hold on! We still need to add the MSVCR’s DLLs. So download it according to your python version:
- Python 2.4 or Python 2.5 – Microsoft Visual C++ 2005 Redistributable Package
- Python 2.6, 2.7 or 3.x – Microsoft Visual C++ 2008 Redistributable Package
Now update your .iss file, so it can install those DLLs too. I used a solution I’ve found on StackOverFlow and it works fine.
At Files section insert the vc_redist’s path that you’ve just downloaded:
[Files]
Source: "vcredist_x86.exe"; DestDir: {tmp}; Flags: deleteafterinstall
At the end of the Run section, paste it as it is:
[Run]
; add the Parameters, WorkingDir and StatusMsg as you wish, just keep here
; the conditional installation Check
Filename: "{tmp}\vcredist_x86.exe"; Check: VCRedistNeedsInstall

[Code]
#IFDEF UNICODE
 #DEFINE AW "W"
#ELSE
 #DEFINE AW "A"
#ENDIF
type
 INSTALLSTATE = Longint;
const
 INSTALLSTATE_INVALIDARG = -2; // An invalid parameter was passed to the function.
 INSTALLSTATE_UNKNOWN = -1; // The product is neither advertised or installed.
 INSTALLSTATE_ADVERTISED = 1; // The product is advertised but not installed.
 INSTALLSTATE_ABSENT = 2; // The product is installed for a different user.
 INSTALLSTATE_DEFAULT = 5; // The product is installed for the current user.

 VC_2005_REDIST_X86 = '{A49F249F-0C91-497F-86DF-B2585E8E76B7}';
 VC_2005_REDIST_X64 = '{6E8E85E8-CE4B-4FF5-91F7-04999C9FAE6A}';
 VC_2005_REDIST_IA64 = '{03ED71EA-F531-4927-AABD-1C31BCE8E187}';
 VC_2005_SP1_REDIST_X86 = '{7299052B-02A4-4627-81F2-1818DA5D550D}';
 VC_2005_SP1_REDIST_X64 = '{071C9B48-7C32-4621-A0AC-3F809523288F}';
 VC_2005_SP1_REDIST_IA64 = '{0F8FB34E-675E-42ED-850B-29D98C2ECE08}';
 VC_2005_SP1_ATL_SEC_UPD_REDIST_X86 = '{837B34E3-7C30-493C-8F6A-2B0F04E2912C}';
 VC_2005_SP1_ATL_SEC_UPD_REDIST_X64 = '{6CE5BAE9-D3CA-4B99-891A-1DC6C118A5FC}';
 VC_2005_SP1_ATL_SEC_UPD_REDIST_IA64 = '{85025851-A784-46D8-950D-05CB3CA43A13}';

 VC_2008_REDIST_X86 = '{FF66E9F6-83E7-3A3E-AF14-8DE9A809A6A4}';
 VC_2008_REDIST_X64 = '{350AA351-21FA-3270-8B7A-835434E766AD}';
 VC_2008_REDIST_IA64 = '{2B547B43-DB50-3139-9EBE-37D419E0F5FA}';
 VC_2008_SP1_REDIST_X86 = '{9A25302D-30C0-39D9-BD6F-21E6EC160475}';
 VC_2008_SP1_REDIST_X64 = '{8220EEFE-38CD-377E-8595-13398D740ACE}';
 VC_2008_SP1_REDIST_IA64 = '{5827ECE1-AEB0-328E-B813-6FC68622C1F9}';
 VC_2008_SP1_ATL_SEC_UPD_REDIST_X86 = '{1F1C2DFC-2D24-3E06-BCB8-725134ADF989}';
 VC_2008_SP1_ATL_SEC_UPD_REDIST_X64 = '{4B6C7001-C7D6-3710-913E-5BC23FCE91E6}';
 VC_2008_SP1_ATL_SEC_UPD_REDIST_IA64 = '{977AD349-C2A8-39DD-9273-285C08987C7B}';
 VC_2008_SP1_MFC_SEC_UPD_REDIST_X86 = '{9BE518E6-ECC6-35A9-88E4-87755C07200F}';
 VC_2008_SP1_MFC_SEC_UPD_REDIST_X64 = '{5FCE6D76-F5DC-37AB-B2B8-22AB8CEDB1D4}';
 VC_2008_SP1_MFC_SEC_UPD_REDIST_IA64 = '{515643D1-4E9E-342F-A75A-D1F16448DC04}';

 VC_2010_REDIST_X86 = '{196BB40D-1578-3D01-B289-BEFC77A11A1E}';
 VC_2010_REDIST_X64 = '{DA5E371C-6333-3D8A-93A4-6FD5B20BCC6E}';
 VC_2010_REDIST_IA64 = '{C1A35166-4301-38E9-BA67-02823AD72A1B}';
 VC_2010_SP1_REDIST_X86 = '{F0C3E5D1-1ADE-321E-8167-68EF0DE699A5}';
 VC_2010_SP1_REDIST_X64 = '{1D8E6291-B0D5-35EC-8441-6616F567A0F7}';
 VC_2010_SP1_REDIST_IA64 = '{88C73C1C-2DE5-3B01-AFB8-B46EF4AB41CD}';

 // Microsoft Visual C++ 2012 x86 Minimum Runtime - 11.0.61030.0 (Update 4)
 VC_2012_REDIST_MIN_UPD4_X86 = '{BD95A8CD-1D9F-35AD-981A-3E7925026EBB}';
 VC_2012_REDIST_MIN_UPD4_X64 = '{CF2BEA3C-26EA-32F8-AA9B-331F7E34BA97}';
 // Microsoft Visual C++ 2012 x86 Additional Runtime - 11.0.61030.0 (Update 4)
 VC_2012_REDIST_ADD_UPD4_X86 = '{B175520C-86A2-35A7-8619-86DC379688B9}';
 VC_2012_REDIST_ADD_UPD4_X64 = '{37B8F9C7-03FB-3253-8781-2517C99D7C00}';

function MsiQueryProductState(szProduct: string): INSTALLSTATE;
 external 'MsiQueryProductState{#AW}@msi.dll stdcall';

function VCVersionInstalled(const ProductID: string): Boolean;
begin
 Result := MsiQueryProductState(ProductID) = INSTALLSTATE_DEFAULT;
end;

function VCRedistNeedsInstall: Boolean;
begin
 // here the Result must be True when you need to install your VCRedist
 // or False when you don't need to, so now it's upon you how you build
 // this statement, the following won't install your VC redist only when
 // the Visual C++ 2010 Redist (x86) and Visual C++ 2010 SP1 Redist(x86)
 // are installed for the current user
 Result := not (VCVersionInstalled(VC_2010_REDIST_X86) and
 VCVersionInstalled(VC_2010_SP1_REDIST_X86));
end;
And now compile your file. You have a setup.exe as the Output and this is able to install our boneca.exe and the necessary DLLs to run it on every goddamn Windows.
Conclusion:
If you read the 3 posts you’ve learned how to create an executable using Python with auto-update feature and an MSI installer to distribute it for any Windows version.